.png)
Tutorial - Creating a Page Layout
In this tutorial we'll design a page layout that can later be used with puzzles that you create. We'll create a simple layout to demonstrate how this is done. It will provide a foundation for creating more sophisticated designs later.
Puzzle Page Layouts
To begin, click on Edit | Page Layout from the Crossword Construction Kit window to open the Puzzle Page Layouts window.
This window lists layouts already created. Click on the New button to open the Page Creator window where the actual page design occurs.
Page Creator
(1).png)
The first step is to assign a name to the layout. In the name field, enter Tutorial. Next make sure the paper size is set to Letter and the orientation is set to Portrait.
Title
Now we will start designing the layout. Click on the Title icon and move the mouse to the layout grid area. Click in the grid area to insert a gold Title rectangle. Right click on the Title rectangle to open a menu. Left click on the Size and Position menu option to open the Size & Location of Title window.
.png)
Edit the values to resize and reposition the title. In the Left field, enter 3.250. This leaves a 3.25 inch margin on the left. Enter .9 in the Top field to leave a margin of .9 inches at the top. Enter a width of 2.000 and a height of .250 to make the title box two inches wide and a quarter inch high. Click OK to save the changes and move the Title rectangle to the coordinates entered.
Puzzle
Click on the Puzzle icon and then click somewhere below the Title rectangle on the layout grid. A red colored puzzle block is displayed in the layout. Right click on the puzzle box to open the menu. Left click on Size and Position to open the Size & Location of Puzzle window.
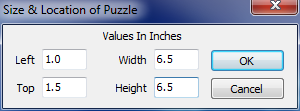
Now edit the values in this window. In this example we'll make a large puzzle area. In the Left field, enter 1.0 to leave a one inch margin on the left. Enter 1.5 in the Top field to so that the top edge of the puzzle is 1.5 inches below the top of the page. Enter a width of 6.5 and a height of 6.5 to make the puzzle box 6.5 inches square. Click OK to resize and move to the coordinates and save the changes.
Across Clues
Click on the Across Clues icon and then click somewhere below the puzzle box on the layout grid. A blue colored Across Clues block displays in the layout. Right click on the Across Clues box in the layout to open the menu. Left click on Size and Position to open the Size & Location of Across Clues window.

Now edit the values in this window to size and position the header box. In the Left field, enter 1.0 to leave a 1.0 inch margin on the left. Enter 8.5 in the Top field so that the top of the header box is 8.5 inches below the top of the page. Enter a width of 3.0 and a height of 2.0 to make the puzzle box 3 inches wide and 2 inches high.
Click OK to save the changes. The Across Clues box is resized and moved to the coordinates entered.
Down Clues
Click on the Down Clues icon and then click somewhere below the puzzle box on the layout grid to display a green Down Clues block in the layout. Right click on the Down Clues box to open the menu. Left click on Size and Position to open the Size & Location of Down Clues window.
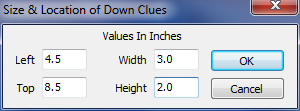
Now edit the values in this window to size and position the box. In the Left field, enter 4.5 to leave the left edge of the box 4.5 inches from the left edge of the page. Enter 8.5 in the Top field so that the top of the header box is 8.5 inches below the top of the page. Enter a width of 3.0 and a height of 2.0 to make the puzzle box 3 inches wide and 2 inches high.
Click OK to resize the Down Clues and move to the coordinates entered, just to the right of the Across Clues.
Across Clue Header and Down Clue Header
Lastly, we'll add the headers above the Clue boxes so that the printed puzzle will show which clues are the Across clues and which are the Down clues. Click on the Across Header icon and click below the Puzzle box and above the Across Clues box to insert a small blue Across Header box. Click on the Across Header box once to place small square boxes around the corners and mid-points of this box. Hold down the left mouse button and drag the box so that it is centered above the Across Clues box.
Click on the Down Header icon and click below the Puzzle box and the above the Down Clues box to insert a small green Down Header box. Then follow the steps above to drag the box and center it above the Down Clues box.
The page should look as shown below.
(1).png)
Click on the Save button to save the new format created. It can now be selected as a layout when creating or modifying puzzles.
Note: Any of the boxes may be dragged and resized with the mouse. Or you can use the Size and Location windows to create exact sizes and positioning. A right mouse click on any of the boxes will open a menu where you can select other options that we did not use in the tutorial. You can change font types, size or color, number of columns in the clues, etc.