Page Creator Tips
How to place an image behind a puzzle
Follow the steps below to include images as backdrops behind your puzzles.
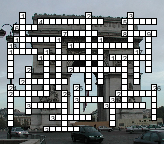
Sample puzzle with image backdrop
To start, first open the Crossword Construction Kit window and click on Edit > Page Layout. Or if editing a puzzle double click on the Layout button to open the Puzzle Page Layouts window.
1.Choose the page layout that you want to use and double click on it to open in the Page Creator window.
2.Click on the Image icon from the right hand column of choices.
3.Click on the Puzzle box inside the existing layout to insert a smaller white Image box.
4.Resize the Image box by dragging the edges to match the size of the Puzzle box and completely cover it.
5.Right click on the image box and select Load Image from the menu options.
6.Browse to the image file on your computer that you want to use and select it.
7.After it is selected, right click again on the Image box and choose Order > Send to Back to place the image behind the puzzle.
8.Right mouse click on the Puzzle box and select Properties from the menu.
9.Select the Skeleton Puzzle option and save.
When you view or print the puzzle, the image will display behind the puzzle as illustrated in the example above.
I sent a puzzle page layout I created to a friend who also uses the Crossword Construction Kit. When the layout was opened, the image was missing. Why?
Images are not embedded into the puzzle layouts. If you export a page layout and the layout contains a bitmap or other type image, the recipient of the page layout will also need access to the image. The layout looks for the location on your computer where the image is stored. In essence you need to send both the layout and the image file. They would then have to link the image to the layout.
How can I create a two page layout?
You would need to create two separate page layouts. For example you can place the puzzle and title on one of the page layouts. Then create another layout that would contain the down/across clues and headers along with any other text components you may want to place on the page. After you have designed the two layouts, print each one separately. The puzzle will print on page one and the clues on the following page.
While creating a page layout I was using the Size and Position option to position an object on the page. I accidentally typed in a value that positioned the object off of the page and now can't right click on it to reposition. What should I do?
Let's say that you positioned the Title off of the page layout. Since it's off the page, you cannot right click on the object to open the menu options. The Title button has been grayed out so you can't just place another title object on the page. But you do have the option to click on the Objects button and select Title from the list of objects that you've already added to the page layout. The menu options for Title will appear where you can select Size and Position to correctly reposition the Title.
How can I enlarge the squares of the puzzle?
The answer to this depends on a couple of factors. These include the puzzle shape chosen and the size of the Puzzle Object on the page layout you are using. The puzzle shape expands to fill the area designated for the puzzle on the page layout. Let's examine how the puzzle shape first impacts the squares on the puzzle.
When you create a puzzle, you have the option to select a Puzzle Shape by clicking on the Shapes button. You can choose squares, triangles, circles, cars and a variety of other shapes for the puzzle. Let's compare a puzzle shape of a 10 x 10 square to that of a 20 x 20 square. In each case, the puzzle will fill the exact same area on the printed page. However, the 10 x 10 puzzle will have bigger squares because there are squares for the same amount of space. So, the larger the dimensions of the puzzle shape, the smaller the puzzle squares will be.
The second factor is decided by the page layout selected. The larger the area for the puzzle in the page layout, the larger the puzzle squares will be. The program comes with a few predefined page layouts, but you can also create any number of additional layouts. You can determine where to place the puzzle and its size.
The Creating a Page Layout tutorial in the help file walks through the process of designing a layout. A video on our website also demonstrates how to do this.
How can I print out a list of puzzle words on the same page as the puzzle?
Create (or modify) a new page layout and add the Word List crossword object to the page layout. You can create, modify or copy a page layout by choosing Edit | Page Layout from the menu of the Crossword Construction Kit window.
How can I make my fonts bigger for the clues, word lists or any part of the printout?
The following instructions, for the most part, can apply to any of the puzzle objects. There are 3 or 4 factors involved in this process. Each requires the modification or creation of a new Page Layout. So let's use the Word List as our example.
The factors for the Word List will be the physical size of the object on the Page Layout, the actual font size chosen, the Make It Fit (Auto Shrink Font) option and number of columns used. While in the Page Layout Designer, each of these factors can be modified by right clicking on the Word List object and selecting the appropriate menu item.
·The size of the object can be changed using the Size & Position menu option.
·The font size can be changed using the Text Font menu option.
·The Make It Fit and the Number of Columns can be changed using the Properties menu option.
We'll examine how these factors all interact. The most obvious is the Size factor. The larger the area you provide for the word list, the larger potential font size you can use.
However, the other factors also make a definite impact. So let's next look at the Font Size itself. Here you can specify the size, color, style, etc of the font to be used. So you choose a font size of 20. But how do you know if that font is too big or small to be used in the designated area? This is where the Make It Fit option comes into play which is a default value.
The Make It Fit option will ensure that your text will fit in the area you have designated. It does so by first using the font you have selected and continually shrinking its size until it fits in the area specified. If you do not use this option, then the font size selected will be inserted. However, you run the risk of the font being too large and if it is, some of the words will not appear because they do not fit in the designated area. We recommend that you use the "Make It Fit" option in most instances.
The last factor here is the number of columns. The default is set to a single column. So if the area (size) where you are placing the word list is not a long vertical strip, but a horizontal area, you will want to increase the number of columns.
In summary, for the best results, you will want to do the following:
1.Choose an adequate size to hold all the words.
2.Choose an adequate number of columns to use based on the size.
3.Choose a very large font size.
4.Choose the Make It Fit (Auto-Shrink Font) option.
How can I make my changes such as font size, colors, etc. permanent?
Font sizes, colors, etc. are all tied directly to the Page Layout and the values are saved permanently with the Page Layout. So to make permanent changes, you need to modify or create a Page Layout. To associate your newly created or modified page layout with an existing puzzle, double click on the puzzle of choice from the Crossword Construction Kit window. On the resulting screen, click on the Layout button. Next highlight your puzzle layout you just created or modified and click on the Select button. And finally click on the Save button.
If you modified a Page Layout that is associated with an existing puzzle, you still need to associate the new modified Page Layout with the puzzle. The puzzle maintains the old information until the change has been saved. The Print window provides an area where you can Override the Page Layout, Fonts, etc. These Puzzle Overrides are temporary and only affect the puzzle for the current print job.